Breaking Down Overwhelming Pieces
Analysis Lesson 1
It’s easy to be overwhelmed when faced with a new piece.
Known as sight-reading, this is a test of skill, musicality, and technique under time and performance pressure.
Students who undertake exams are familiar with this dreaded part of the exam process.
This course is designed to give you a framework for learning new pieces.
The first step is to analyze the work. This means looking through the result from the beginning to the end, carefully noting the following:
1. Key and Tonality
When looking at a new piece of music, it is important to establish what key(s) it is in.
This will help you establish the tonality and anticipate modulations to related keys.
From a practical point of view, knowing what key a piece is in will assist with finger placement.
Once you have identified the primary key, see sections where the music modulates (changes key).
Pay attention to cadence points which are usually at the end of phrases or sections.
2. Time and Tempo
The time signature is essential for establishing the beat and accenting of a work.
Identifying if a work is in simple or compound time will enable a greater sense of cohesion. At the same time, the meter (duple, triple, or quadruple) will provide a foundation of rhythmic stability.
The tempo refers to the speed at which you will play. As a general rule, a slower pace ensures steady continuity and fewer mistakes.
3. Form
Look for repeated sections – this will increase your fluency and help you identify contrasting areas.
For many classical works, form (binary, ternary, rondo, sonata, etc.) can be established from visual inspection.
4. Style and Genre
Knowing the style of a piece is important – is it classical, waltz, pop, country, reggae, swing.
Identifying the style makes it easier to transform the music from something mechanical to something with meaning and emotion.
Listening Lesson 2
If possible, listen to your work before you attempt to play it.
It’s always helpful to hear the original version of a work (if possible, performed or directed by the composer).
Pay special attention to instrumentation, harmony, tempo, and dynamics elements.
After this, listen to other versions of the work.
Generally, performers will fall into one of two categories – purists who abide by original scores and markings and those who wish to put their spin on things.
Neither is better than the other. Music is subjective.
By listening to other versions of your chosen work, you will have a deeper appreciation for the history of the work and be able to present a more informed version.
An excellent example of this may be The Christmas Song (Chestnuts Roasting on an Open Fire).
Initially written in 1945 by Robert Wells and Mel Tormé, it was first recorded by the Nat King Cole Trio in 1946.
Since then, it’s been recorded multiple times by multiple artists.
Cole himself re-recorded the song no less than three times, changing the arrangement.
Its second recording featured a small string section, and in 1953, it expanded to include a full orchestra.
This song has regularly been featured on music charts since then. It has been covered by both groups and solo artists, including Michael Bublé, Shawn Mendes, Ella Fitzgerald, Frank Sinatra, Celine Dion, The Carpenters, The Jackson 5, and Christina Aguilera.
Thanks to YouTube, there is absolutely no shortage of people (both professionals and amateur enthusiasts) who you can use as reference points.
Listening to your chosen work doesn’t end with listening to other performers’ versions.
After analyzing your work, you can make notes regarding how you wish to approach the piece.
Ideally, you will want to learn the work in its original state before you make any changes, but it is still helpful to have an idea of the musical elements you wish to alter.
For example, this may include tempo, harmony, instrumentation, rhythm, and dynamics.
Some software (Garageband, Audacity, etc.) will allow you to hear these changes before you start to learn the work, which may make your life easier when you begin to play the piece.
Melodic Line Lesson 3
The next step is to begin playing!
Once you have heard the piece and you are familiar with the melodic line, it’s a good idea to start there.
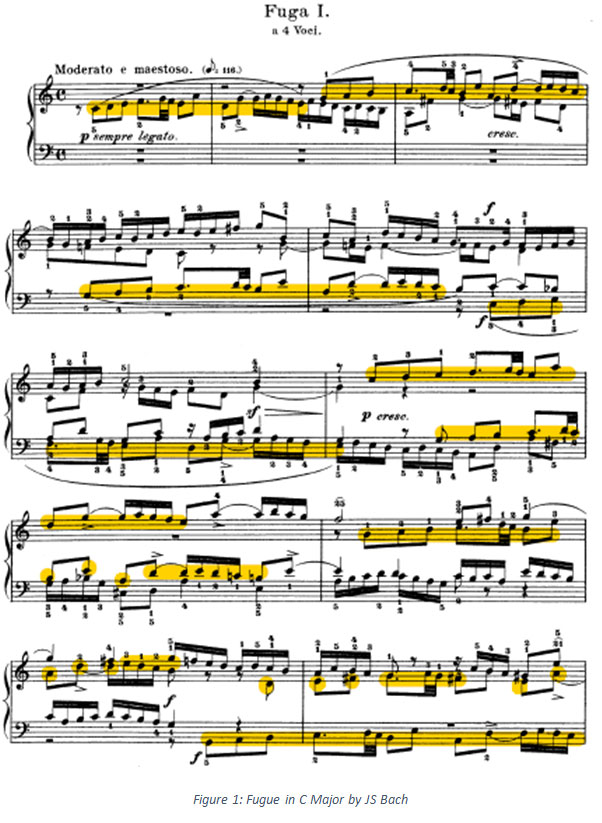
Some pieces will have the melodic line only in the right hand. Others will split the melody between different “voices,” such as Bach’s Fugues, where the musical motif will be passed around to different areas of the keyboard to be announced by both hands.
If this is the case, you may benefit from highlighting or marking up the music.
The melodic line is the top focus point and needs to be clear to the audience.
This is especially true if the melody is rephrased, modulated, or rhythmically altered.
The audience must always be able to identify it in its different presentations.
An example might look like this:
Rather than playing from the beginning to the end, focus on smaller sections (remember your earlier analysis).
Break down the melodic line into phrases and work on each word until it is rhythmically accurate – you may need to experiment with different fingering to ensure phrases are clean.
When you come upon fingering that works, write it on your score!
At this stage, if your score has ornamentation such as trills and mordents, it may be helpful to omit them and focus on the critical melodic phrases.
Once individual phrases sound good, add ornamentation, dynamics, and other phrasing elements such as touch (legato, staccato, etc.).
Again, work slowly to ensure accuracy rather than racing to the end.
Once all elements are secure, you may wish to practice slowly from the beginning to the end.
Accompaniment Lesson 4
Using the same Bach Fugue in C major as an example, you can now clearly see which elements are the melody and harmony.
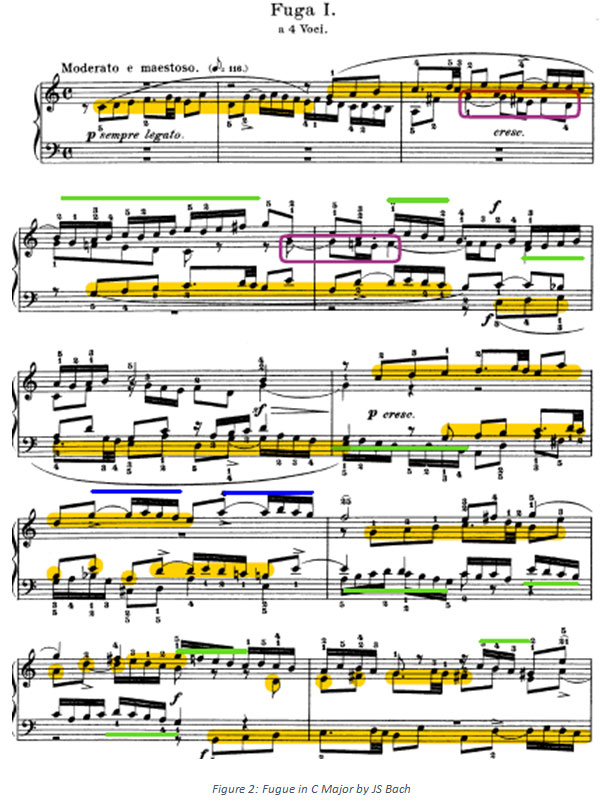
The melody remains highlighted in yellow while the other colors denote other key musical features.
For example, the green lines help illustrate scale runs which act as connecting passages.
The purple box and blue lines denote sequences – rhythmically identical fragments shifted up by a key.
This is a more complex style of piano music, but it serves to illustrate the point.
In more straightforward scores or vocal scores, you may use chord progressions to support the melody.
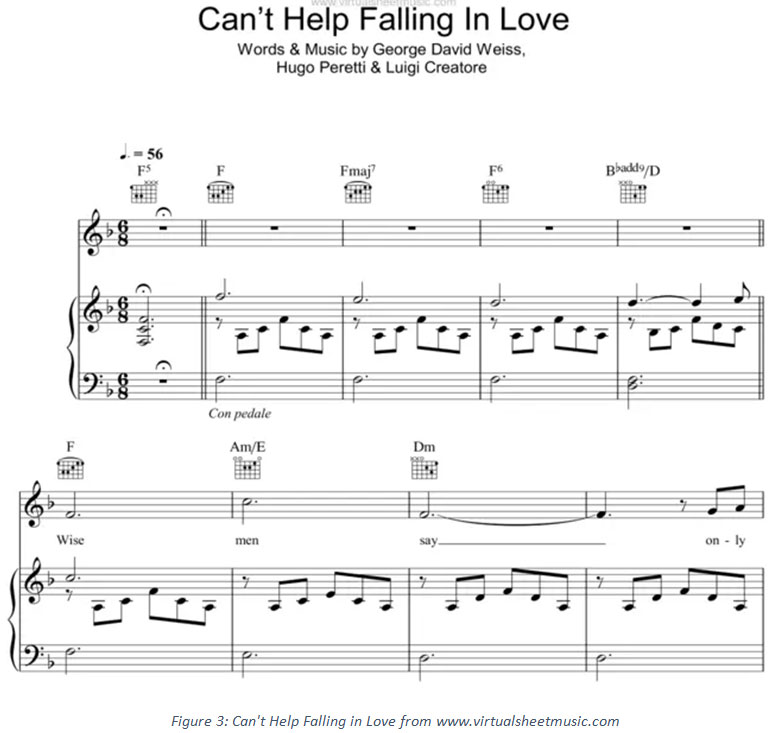
In the example above, you can follow the piano score (lower two systems joined by the brace), or if you are familiar with chords, you can follow the chords as shown by the guitar tabs.
Depending on the style of music, you may prefer to stick with simple chords before attempting the piano arrangement as written.
Putting Together Lesson 5
Now that you have worked out the different elements of your piece, it’s time to put in the final touches.
It should go without saying that playing hands together will be the first big challenge.
Some things to look out for include:
Aim for a slow tempo and rhythmic accuracy.
Be sure to pay attention to the phrasing of the melodic line, even if it does change between the hands.
Work the ornamentations in one at a time.
This might mean practicing ornaments away from the piece to become familiar and confident with fingering.
Ornaments must be seamless additions to the main melody, adding interest and flair without muddying the timing or structure.
Sidenote: for many classical composers, ornamentation was improvised on the spot during a performance.
Keep that in mind when you play your piece!
You may notice that your fingering needs to change due to playing hands together.
This usually happens when the left hand reaches up into the treble, or the right-hand leads into the bass. Make careful notes on your score, so you don’t get confused.
As you become more fluent with the piece, experiment with contrasts in dynamics – phrases where the music may sound better, softer, or louder.
As a general rule, ascending scale passages lend themselves to a gradual crescendo, while descending passages work well with decrescendos.
Highlight form and structure by gradually decreasing your speed towards cadence points or the ends of significant phrases.
This adds interest and clarity to work.
Once everything is in place, gradually increase your tempo, making sure you still keep to a strict beat.
This can be done by practicing with a metronome.
When you think your piece sounds good, record yourself and listen to your performance with a critical ear.
Final Touches For Performance Lesson 6
Congratulations, you’ve put in the hard work and now you’re about to perform your work for family, friends or just add it into your “ready-to-go” repertoire.
Here are some last-minute tips to make sure all your hard work pays off.
Have a plan
Run through how you want your performance to go in your head and then write it down.
If this work is part of a setlist, where do you want it to go?
Make sure that it fits with the overall feel/theme of your performance.
Make sure your equipment is ready
This might mean getting to your location early and setting up or just being able to practice on the piano or keyboard that you’ll be performing on.
Most exam situations allow for students to play a few scales on the piano before the exam starts.
This is to allow students to adjust their touch to render smooth dynamics.
If the performance is going to be live or recorded, make sure that you do a few test runs to make sure that the sound and video quality are good.
Getting rid of performance jitters
Getting ready to perform in front of people is incredibly daunting even for professionals.
Before you begin to perform you need to ensure that you are physically and mentally prepared.
You can gain a lot of confidence just by knowing that you’ve put in the hard work into analyzing the piece, listening to other people perform it, and of course, practicing it.
You can shake off last-minute nerves by running through the piece either physically or mentally.
Before a big performance, try not to eat or drink anything too heavy and try to do some gentle stretches.
For many people, physical movement and deep breathing is great for increasing focus
Connect emotionally with the song
It’s very easy to go on autopilot after so much practice but it’s important that as a performer you connect with your music and connect with your audience.
Think of how the music makes you feel and how you want your audience to feel.
The elements of music (dynamics, speed, tempo, phrasing, etc) are the tools that will allow you to capture and convey these emotions.
Interact with your Audience
It doesn’t matter if you are performing for one person or one hundred.
You’ll be more confident if you enjoy the company of your audience.
They are there either because they love you, music or both!
If you are feeling a little nervous or shy, a simple “hello” and smile before you begin to introduce your pieces will suffice.
Following each performance, it’s also nice to thank the audience.
This would also be a great time to tell your audience more about your music, influences, and where they can listen to more of your work.