Blues Piano
Lesson One – Left-Hand Patterns (1)
The Blues is a genre of music that originates from the Southern part of the US.
Essentially, Blues derives from African American slaves who used songs to alleviate the terrible conditions they experienced at the time.
When you describe yourself as feeling’ blue,’ you tell a low, sad, lonely feeling that you can easily imagine slaves would feel.
From these dark beginnings that are hard to imagine in the comfort of the 21st Century, we have been given the blues music whose characteristic we will explore throughout the following ten lessons.
The piano was not a traditional instrument of The Blues but was added later as the popularity of the genre spread.
We begin with the piano’s left hand, as this is where the ‘feel’ and rhythmic momentum come from.
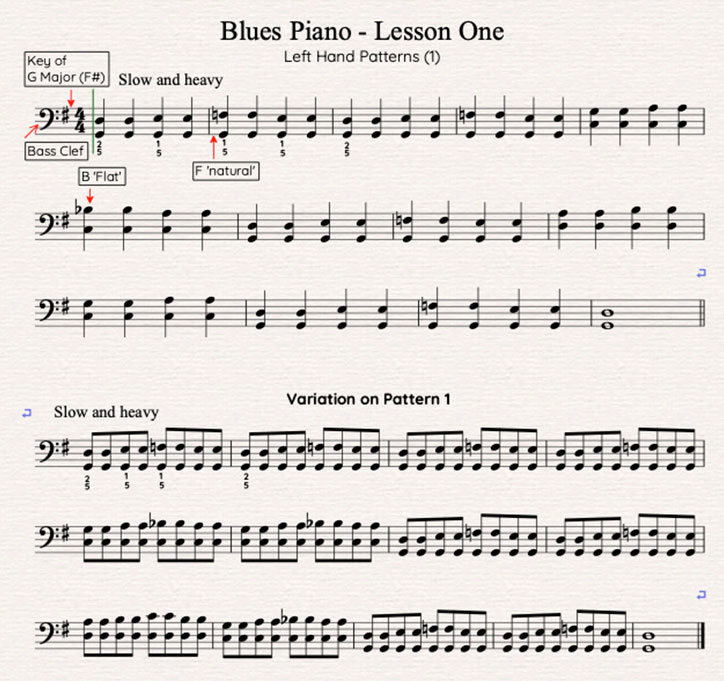
Let’s initially look at some popular left-hand patterns that will get you started quickly and provide a basis for developing your blues performing.
Below are the examples used in the lesson. These patterns can form the base for many ‘variations’ to make yourself.
By listening to The Blues, you’ll quickly pick up other shapes and patterns you can try out with your left hand.
Practice slowly – The Blues is not usually fast-paced music.
If you wish, change the key of the patterns: try the keys of C or F.
Remember, the ‘fingering’ used is only a suggestion that is most commonly used.
Find what works best for you and produces the sound you want. (The numbering works so that the bottom figure (5) is your little finger and (1) your thumb).
There is no ‘pedal’ used in these examples, and I suggest you approach the Blues without any.
Lesson Two – Left-Hand Patterns (2)
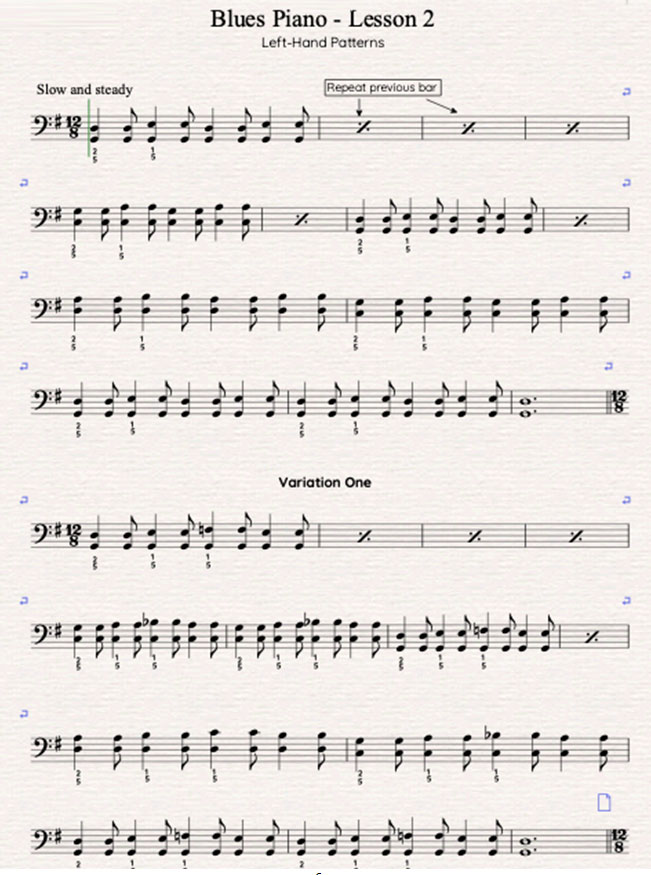
You may well feel that these first patterns don’t quite have the ‘feel’ you have heard in much Blues music.
This may be because there is no ‘swing’ to these patterns.
Not all Blues music has this rhythmic feel, but much of it does to some degree or other.
I mention the word feeling as the idea of swing in Blues or Jazz cannot be quickly and accurately notated.
As such, listen to the demonstration and try to playback on your keyboard or piano in the same manner.
It needs to be relaxed with a feeling of gently moving forward.
Quite frequently, Blues and Jazz is notated using a 12/8 time signature.
This indicates four main beats in every bar, each with three quavers.
The point is that this time signature is thought to illustrate best the ‘feel’ of gentle swing that is a feature of this genre of music.
Like all these patterns, they can be played and learned in a whole variety of other keys that will be useful for you to know, especially if you’re playing with other instruments.
Try varying these patterns rhythmically to create your designs.
See whether you can copy patterns you hear on recordings of The Blues.
Changing the patterns ‘dynamics’ or volume can bring color and shape to the left-hand part.
Try getting gradually louder then quieter within each bar.
Alternatively, you might like to get louder (crescendo) towards the change of notes, and quieter (diminuendo) as the original notes return.
The options are almost endless, and ultimately, it is a question of how you feel about the music you’re playing.
Lesson Three – Right-Hand Patterns
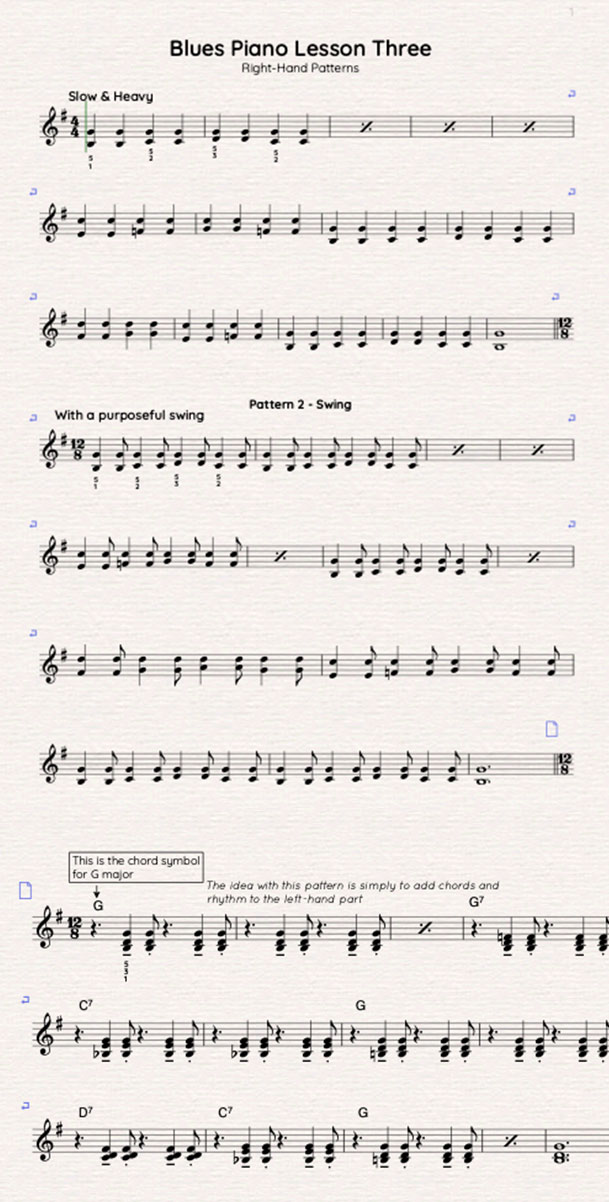
Having spent a couple of lessons working on the left hand and establishing a solid, rhythmic bass, we can now turn our attention to the piano’s right hand.
We will come to more exotic options later in the course, but for now, we’re going to focus on some valuable patterns that complement our work with the left hand.
These patterns can be added to the left-hand ones to form a backing or accompanying base for additional instruments in a band situation.
They are also quite satisfying to play alone and help gain technical strength and an accurate rhythmic feel.
Again, playing these through slowly is key to success.
Concentrate on the fingering that’s right for you, but the gentle, rhythmic swing or ‘straight’ (not swung) feel.
The first pattern is straight. Then there are swing patterns to give variation.
The third pattern is quite challenging as there are rests on the first and third beats of the bar.
Count each bar carefully to ensure you feel where the chords come in.
I have added chord symbols for this pattern, too, so if you can read these, use your own ‘voicings’ or arrangement of notes for each chord.
The ‘jumps’ from some bars to the next (i.e., a chord change) need careful attention.
If you find it too challenging, to begin with, miss out on the last beat of the bar to give you time to move your hand.
Lesson Four – 12 Bar Blues Structure
You will have already noticed that each ‘pattern’ I have introduced you to uses a 12-bar form or structure.
This isn’t an accident but an intentional feature of each pattern.
This is because the Blues commonly falls into 12 bars that then repeat.
There are examples of many different variations on this length, but the 12-bar size is a secure place to begin for our purposes.
You may also have realized that during the 12-bar structure, the chords change regularly too.
Again, this can be different for any Blues song but is a frequently used sequence.
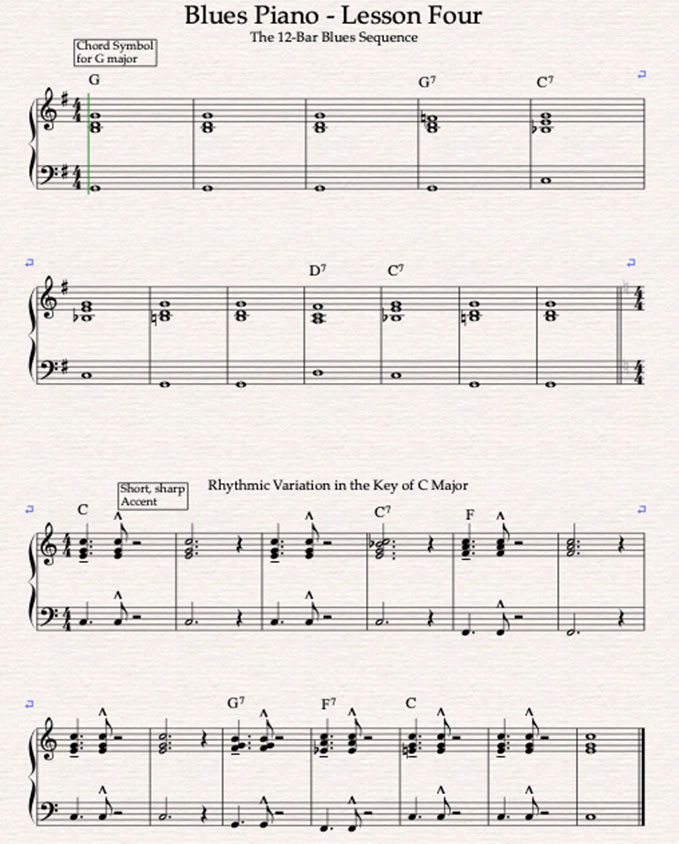
Here it is entirely written out in the key of G major (this marries up with the legend of all patterns so far).
The pattern of Chords for The 12-Bar Blues
G – 4 Bars / C – 2 Bars / G – 2 Bars / D – 1 Bar / C – 1 Bar / G – 2 Bars
The sequence of chords would remain the same even if the ‘key’ of the piece changed.
The addition of 7th notes towards the chord change can change, which helps the ‘ear’ be drawn towards the chord change.
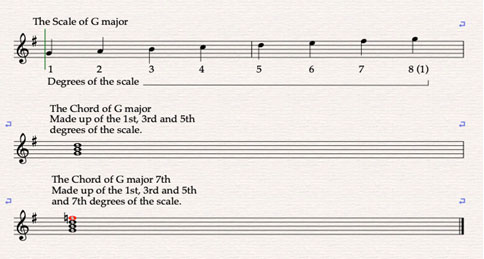
Below is an illustration of how a 7th chord is created.
Note that when we write G7, the 7th is flattened (lowered a semi-tone), from F# to F natural.
(If we wanted the F# as part of the chord, we would have to write the chord symbol Gmaj7).
The critical element of this lesson is to get used to the sequence of chords (in the key of G major initially) and then revise lessons 1 – 3 in light of this chordal pattern.
Try to get the sequence memorized.
Count the sequence through as you play, reminding yourself of the chords as you play them.
In the following exercises, you’ll discover the 12-Bar Blues in the keys of G and C major.
You can play either exercise with either rhythm.
You’ll begin to hear that they sound very much the same harmonically speaking, as the chord sequences are identical.
I have deliberately added a few more 7th chords in the C major example to bring a bluesier flavor to the lessons.
Notice how just by adding the 7th to the chord, it changes the color.
This will be important as we explore The Blues further in the following lessons.
Lesson Five – The Blues Scale
So far, we have explored one or two patterns for both left-hand and right-hand use during the Blues.
We have patterns that swing and those that don’t.
We have also explored the chords used for many blues songs and played the sequence commonly known as The 12-Bar Blues using both hands.
What we are going to dive into is the Blues Scale.
This has various forms, but I have chosen what can be considered the most frequently used version.
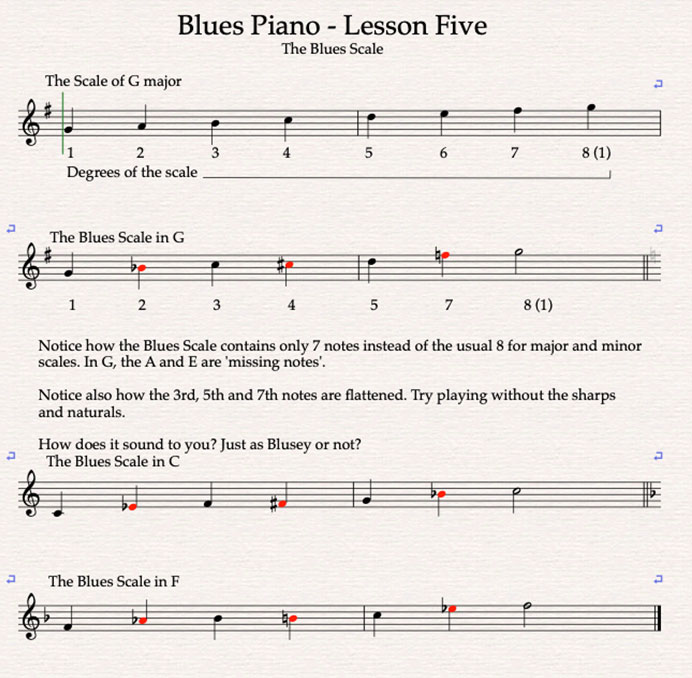
What gives the Blues Scale its unique characteristics is that it ‘misses out’ some notes and includes ‘flattened’ or ‘blue’ notes.
Without going too far down the theoretical road, the Blues Scale flattens (lowers by a half-step or semi-tone) the scale’s 3rd, 5th, and 7th notes.
Remember in Lesson 4 how the 7th note of the chord was flattened?
This is because of the same accidental appearing in the scale.
Below is the Blues Scale in the key of G, F & C Majors.
Try them out very slowly with your RH. You could also try playing with your LH and octave lower than written.
The notes for the LH would be the same, just lower on the piano keyboard.
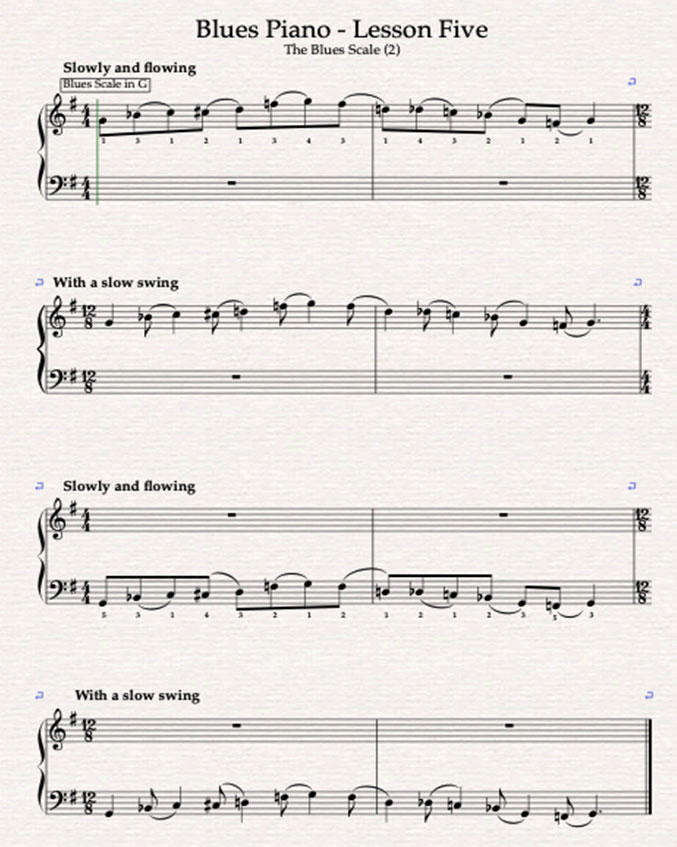
The second illustration invites you to try the Blues Scale in different rhythms and with both hands.
It also offers the opportunity to work on both ascending and descending scales, which will be immensely useful as you progress through the course.
Lesson Six – Putting the LH & RH Together
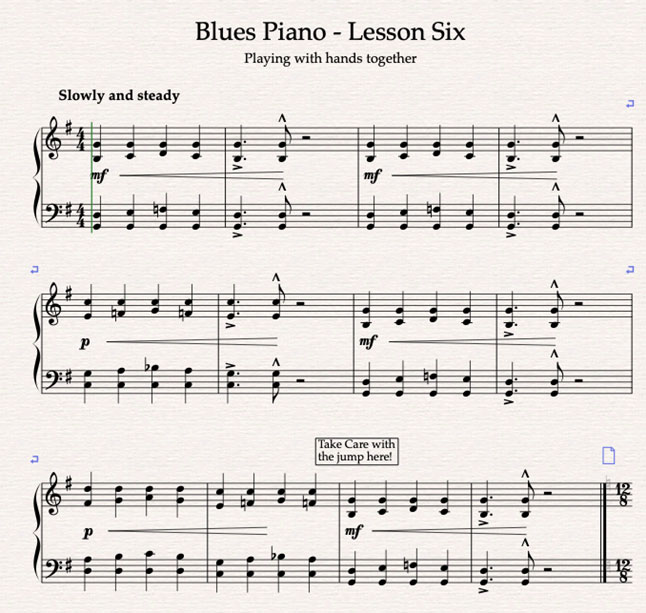
In this lesson, we will explore using both hands together on the piano.
This will use some of the patterns you have previously seen and worked on, making the process, hopefully, less challenging.
When working on two hands, there is no shame at all in practicing one before the other, then both together, perhaps only a bar at a time and always slowly.
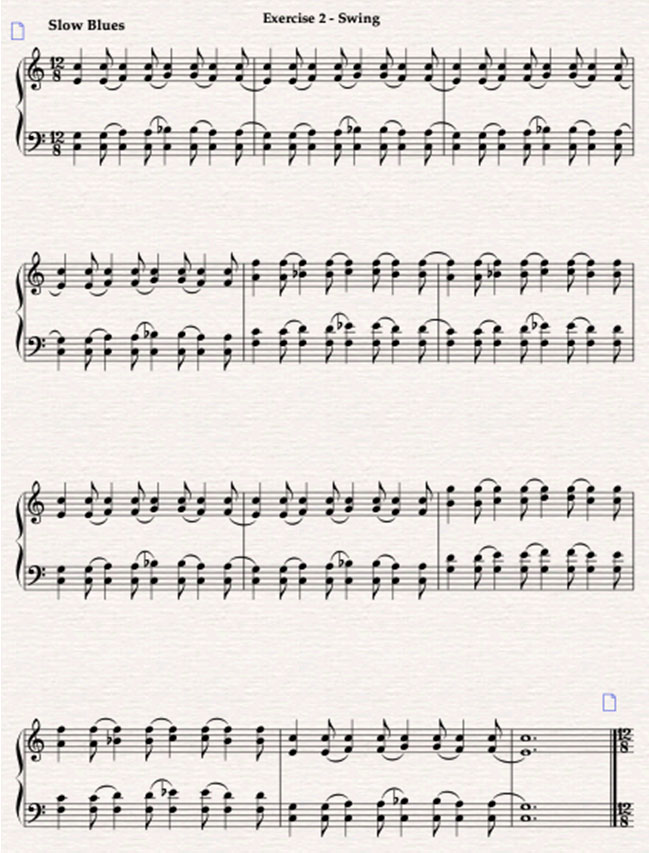
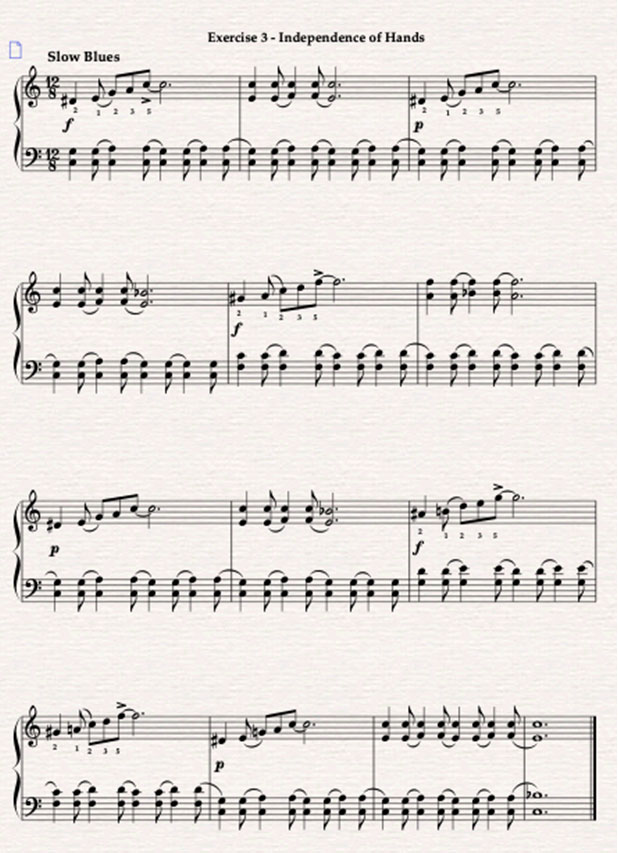
Each of the three exercises presents slightly different challenges.
The first exercise has ‘locked’ hands that remain in the same positions except for chord changes.
This is also with a ‘straight’ rhythm.
Exercise two brings in ‘swing’ time notated as 12/8 and in the new key of C major.
Again, hands are locked to allow you to concentrate on the rhythmic aspect of the piece while carefully listening for the chord changes.
Exercise three brings genuine independence of movement between both hands and remains in C major.
Watch out for notes like D#, G#, and A#. These might be easier thought of as Eb, Ab, and Bb.
Take note of the suggested fingering and move fluently between chord changes.
This takes time. Try to add the dynamics* (volume changes) to gain confidence.
*Dynamics are written in music as:
p = softly / mp = medium soft / MF = medium-strong / f = strongly


Lesson Seven – Riffs
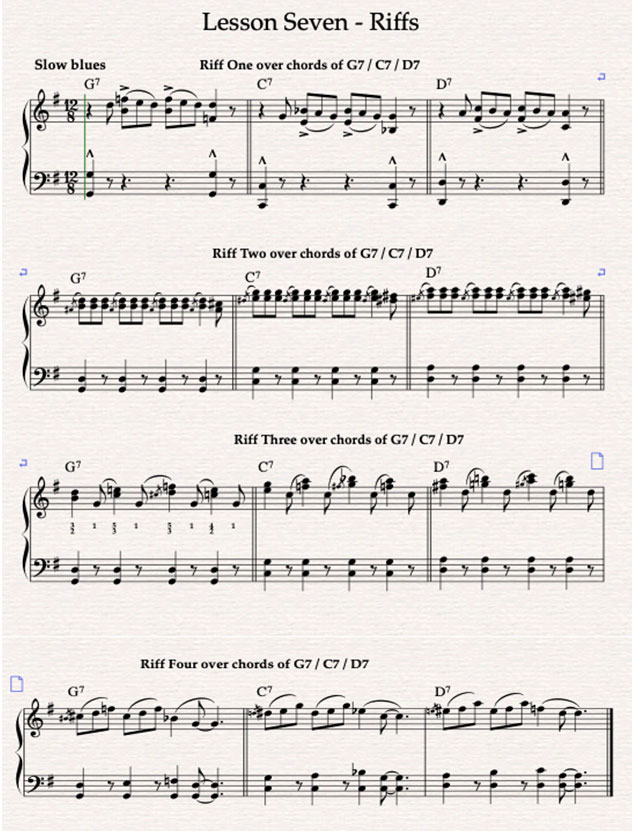
The Blues, like jazz and much Popular music, relies on what is known as ‘riffs.’
These important components are small, often repeated ideas that can form a central focus in the music and act as an accompaniment.
Sometimes riffs can also act as a kind of ‘call and response’ between musicians in a band or between the pianist’s hands.
What is crucial to remember is that even though there are examples of incredibly sophisticated Blues songs, as a musical genre, it is not inherently a forum for overt virtuosity.
Think back to the Blues’ origins, which will make more sense.
In practice, then, we do not need to fly around the piano to play blues riffs effectively.
Instead, learning a few ‘easier’ riffs that can be slotted into a blues or used as the basis for improvisation, I believe, is more beneficial.
As you may reasonably anticipate, the blues scale is a handy starting point for riffs, and these features are in the following examples.
For consistency and ease of learning, I have stayed in the keys we have worked in so far.
Both hands are included in the examples, but working with a single hand is often a solid starting point, adding the other hand when confident.
The rhythms become more complex with some riffs.
Use the video examples to listen through a few times while reading the notation.
Suppose you don’t want to use the notation: don’t! Developing you’re ‘ear’ is a fundamental part of playing The Blues.
Lesson Eight – Intro’s and Outro’s (Endings)
How Blues pieces begin and end is almost vital as how they continue.
Many ways have become ‘classic’ Blues starting and ending phrases; far too many to include here.
By far, the best way is for you to listen to some recorded examples and figure them out for yourself.
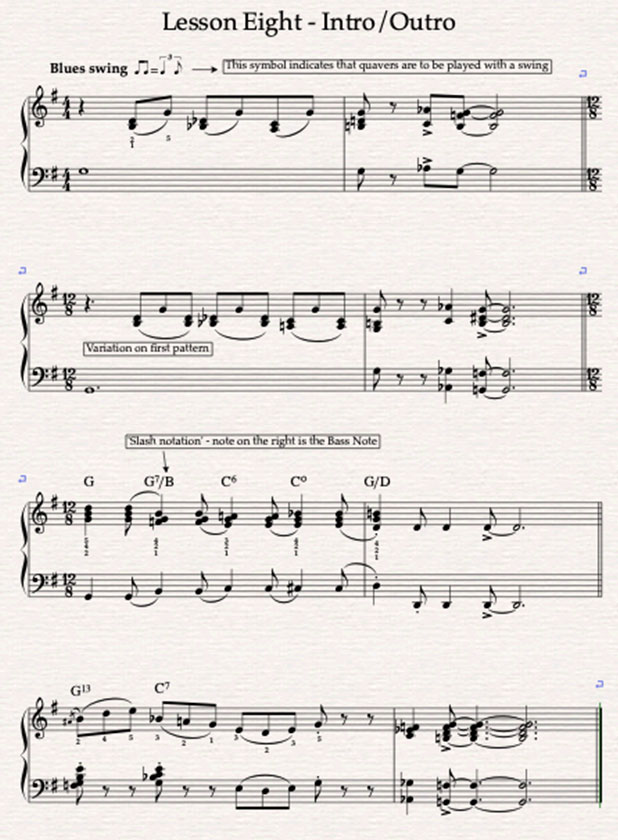
In the meantime, here are some to explore to get their feel.
You’ll discover that these short passages can work to begin or end a piece. The choice is yours.
Keep in mind that the notation varies in Jazz and Blues.
In these examples, I have included a new symbol in the first bar that shows that even when quavers (eight-notes) are notated, the intention is that they are played with a swing.
Also, watch out for ‘little’ notes.
These are commonly referred to as a grace note and have no time value like a crotchet (quarter-note) or quaver (eight-note).
They are performed, in Blues, in quite a lazy, relaxed manner, just before the main beat of the bar in which they appear.
You can play without them if you wish, but they add an essential flavor to the pieces.
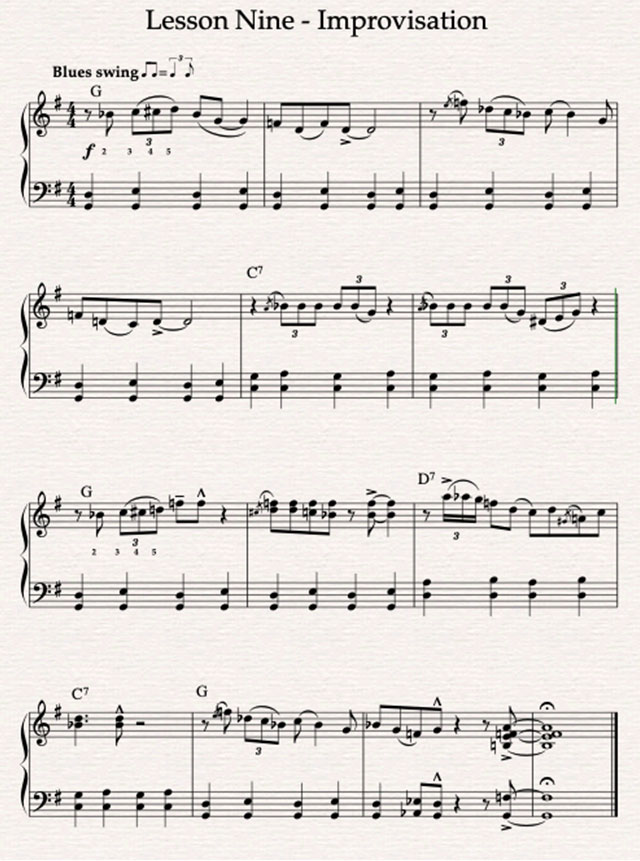
Lesson Nine – Improvisation
Often the very word improvisation puts fear into the hearts of even the most seasons musician.
It doesn’t have to, and with a measured approach is achievable by everybody to a given level.
Blues improvisation does not have to be complicated.
In fact, in my experience, some of the most convincing Blues improvisations use relatively few notes.
Making appropriate use of the Blues scale is an excellent place to start, and the practice example below will offer you the opportunity to try these out.
Remember, you don’t have to play exactly what I have written. You may well find that your version (mistake or otherwise) could be a significant improvement.
I have notated the patterns I would use and develop during an improvisation.
Make good use of the accompanying LH, as I have left relatively straightforward, based on earlier lesson patterns.
Remember from Lesson Four. We explored the 12-Bar Blues structure.
This lesson makes sense to build our improvisations around this standard form.
While there are many variations on the standard chord patterns, we will focus on the familiar three from the earlier lesson (I / IV / V) for this introduction.
In this case, these chords will be G / C & D with the occasional addition of their 7ths.
Lesson Ten – Putting It All Together
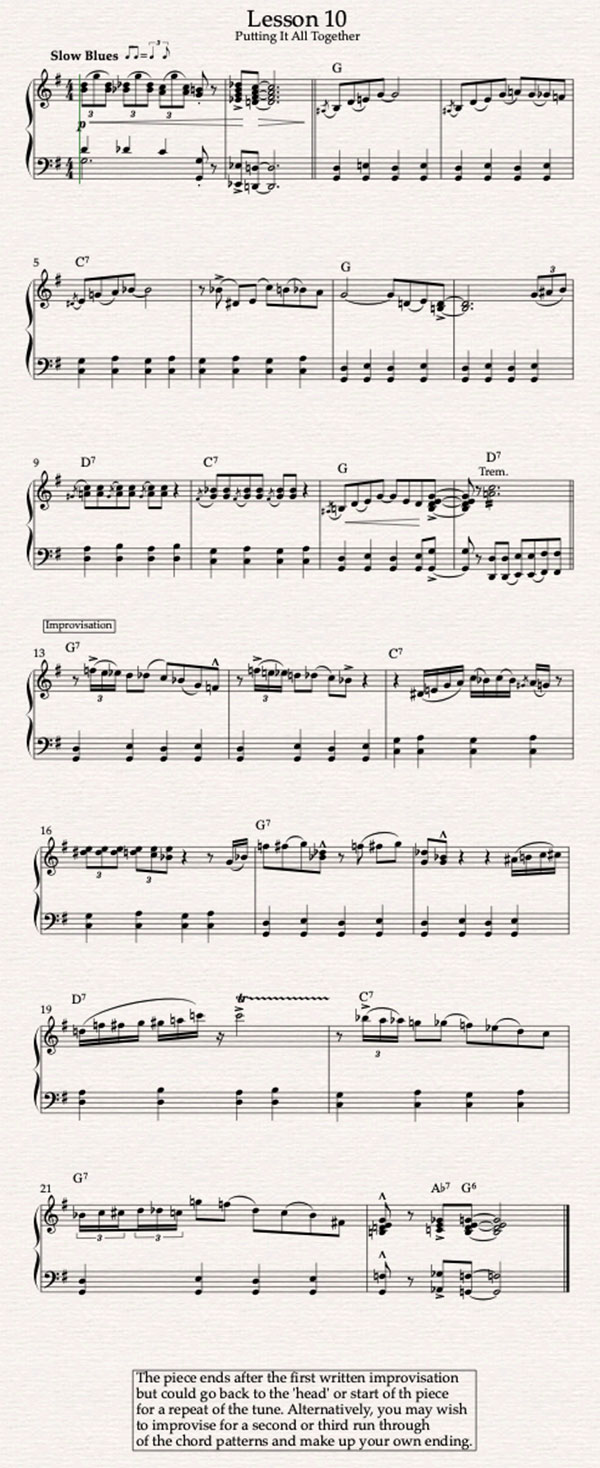
In this final lesson of the series, we will place the cherry on the perfectly formed Blues cake.
It’s time to put together all the various elements we’ve explored over the last nine lessons.
In the Blues Piece below, I have tried to capture each lesson’s separate components from the LH/RH patterns, the intro/outros, riffs, blues scale, and 12-Bar blues structure.
The most important thing now is to have fun with all the various skills you have worked on and see where it takes you.
You will notice I haven’t suggested fingerings for the final piece as I suspect by now you will already have a firm idea of what works best for you.
Remember to think about how you want the passage to sound, which notes require emphasis or shortening, dynamics, and shape.
Try to make every note’ count’ rather than something more superficial.
This will be the way to convincing performances instead of just a display of technique.
I hope you’ve enjoyed exploring the Blues Piano, and I wish you every success in your continuing musical adventure.
 If you wish to download the files to your desktop, simply right click the link below and select ‘save as’
Then select the location you wish to save the files to (either your DESKTOP or MY DOCUMENTS e.t.c.)
Once finished, simply unzip the files (PC use Winzip, MAC use Stuffit) and your files will be there.
All written material can be opened as a PDF.
All video files can be opened with VLC Media Player.
Select your download option below …
